1

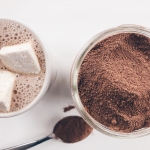
Hot Chocolate Mix with Cacao

What kid (and adult) doesn’t love a nice cup of hot chocolate on those cold Canadian days? I know it’s a favourite for us around the holidays. Nothing beats a fresh cup of hot cocoa after a day of skating on the pond. Truth be told, I’ve actually stopped drinking it years ago after I changed my diet. Have you ever actually read the list of ingredients in some of those pre-packaged things? Yikes.

While I choose to simply live without it, now I have a toddler in my house who wants what everyone else is having… so what’s my solution? We came up with our own, healthified (if you will), dry hot chocolate mix … that can stay in the cupboard just like any other hot chocolate mix you buy. That means it’s ready to go for when the kids come in from playing outside, or unexpected company shows up for a warm drink.

Ingredients:

  • 1 cup raw cacao powder (or good quality coco will do)
  • 1 1/3 cup coconut sugar
  • 1 tsp sea salt
  • 2 tsp vanilla powder (omit if don’t have dry powder)
  • 1 tsp cinnamon

Directions:

Mix all ingredients well in a bowl. Transfer to glass jar for storage.

To make, simply dissolve desired amount of hot chocolate mix in boiling hot water (about half your cups worth of hot water). Top with warm milk of your choice. Note that because this mixture doesn’t contain any kind of powered milks, it’s best served with half hot water, and half warm milk of your choice (it’s AMAZING with homemade nut or seed milks).

This makes just over 2 cups of dry mix.

Tips & Ideas:

Freezes well!If you really want to go all out, you can top with homemade marshmallows. We always make a bunch around the holiday season and have ready to grab in the pantry. It’s easier than you think. Our FAVORITE recipe to date has been from Danielle Walker in her cookbook Celebrations (I HIGHLY recommend any of her cookbooks). For a quick look at how she makes them, click here.

This also makes an excellent gift idea for around the holidays. Who doesn’t love homemade hot chocolate mix with some homemade marshmallows!


Pumpkin Spiced Muffins

In cooking up come fresh pumpkin for my son, my step daughter and I decided to creative in the kitchen! Who doesn’t love a beautifully spiced pumpkin recipe?

So this is what we came up with! And man oh man did they turn out awesome! Gluten, dairy, and nut-free 🙂

Ingredients:

  • 4 eggs
  • 3/4 cup melted coconut oil
  • 1  1/2 tsp vanilla
  • 2 cups coconut sugar
  • 3 cups fresh or canned pumpkin puree
  • 1  3/4 cup oat flour
  • 1/4 cup + 2 tbsp coconut flour
  • 1/4 cup arrow root flour
  • 3 tbsp ground flax
  • 5 tbsp hemp hearts
  • 2 tsp baking soda
  • 1 tbsp cinnamon
  • 3/4 tsp nutmeg
  • 1/2 tsp ground ginger
  • 1/4 tsp ground cloves
  • 1 tsp sea salt
  • dairy-free chocolate chips (*Optional)
  • chopped Pecans (*Optional)

Directions:

Heat oven to 375F. Whisk together eggs, coconut oil, vanilla and coconut sugar in a large mixing bowl. Once combined, stir in the pureed pumpkin.

Mix remaining dry ingredients in a separate bowl. Add dry ingredients to wet ingredients and stir well. Allow batter to sit for approximately 10 minutes to allow the coconut flour to absorb some of the liquid. Scoop into greased muffin liners to about 3/4 full. Top with chocolate chips or chopped pecans (optional). Bake for 20-25 minutes or until golden brown and toothpick comes out clean.

Tips & Ideas:

These freeze excellent!


Spiced Zucchini Muffins

The perfect fall muffin. Full of zucchini and all the spices of fall! This is based on the chocolate zucchini muffin recipe, with some changes!!

This recipe is nut-free (yay! the kids can take it to school), gluten-free, and the best part? You’ve never guess they’re not full of gluten!

Ingredients:

  • 4 eggs
  • 3/4 cup melted coconut oil
  • 1  1/2 tsp vanilla
  • 2/3 cup coconut sugar
  • 1  3/4 cup oat flour
  • 1/4 cup + 3 tbsp coconut flour
  • 1/4 cup + 1 tbsp arrow root flour
  • 3 tbsp ground flax
  • 5 tbsp hemp hearts
  • 2 tsp baking soda
  • 1 tbsp cinnamon
  • 1/2 tsp nutmeg
  • 1 tsp sea salt
  • 4  1/2 cups grated zucchini (not drained or dried if using fresh – you want some moisture for your muffins)
  • 3 tbsp coconut sugar + 1 tsp cinnamon (optional for topping)

Directions:

Heat oven to 375F. Whisk together eggs, coconut oil, vanilla and coconut sugar in a large mixing bowl. Mix remaining dry ingredients in a separate bowl. Add dry ingredients to wet ingredients and stir well. Mix in zucchini. Allow batter to sit for approximately 10 minutes to allow the coconut flour to absorb some of the liquid. Scoop into greased muffin liners to about 3/4 full. Sprinkle with coconut sugar and cinnamon if using. Bake for 20-25 minutes or until golden brown and toothpick comes out clean.

Tips & Ideas:

These freeze excellent! And this recipe is very easy to double if you’re wanting to use up that garden zucchini!


Chocolate Zucchini Muffins

Looking for ways to use up that zucchini from the garden? This muffin recipe came from a dear friend, who’s been working to “healthify” the traditional chocolate zucchini muffin for years. And this is what she came up with! Not only can you actually use up a good portion of your zucchini, you can also feel good knowing there’s lots of added nutrition in these babies! And the best part – they taste better than the traditional recipes you’re used to.

This recipe is nut-free (yay! the kids can take it to school), and I’ve also included a gluten-free version as well!

Ingredients:

  • 4 eggs
  • 3/4 cup melted coconut oil
  • 1  1/2 tsp vanilla
  • 3/4 cup coconut sugar
  • 3/4 cup sprouted spelt flour
  • 3/4 oat flour
  • 3 tbsp ground flax
  • 5 tbsp hemp hearts
  • 2 tsp baking soda
  • 2  1/2 tsp cinnamon
  • 1 tsp sea salt
  • 6 heaping tbsp raw cacao powder
  • 5 cups grated zucchini (not drained or dried if using fresh – you want some moisture for your muffins)
  • Chocolate Chips (optional)

Directions:

Heat oven to 375F. Whisk together eggs, coconut oil, vanilla and coconut sugar in a large mixing bowl. Mix remaining dry ingredients in a separate bowl. Add dry ingredients to wet ingredients and stir well. Mix in zucchini and chocolate chips. Scoop into greased muffin liners to about 3/4 full. Bake for 20-25 minutes or until toothpick comes out clean.

Tips & Ideas:

These freeze excellent! And this recipe is very easy to double if you’re wanting to use up that garden zucchini!

Variations:

Gluten-Free:

Omit spelt flour and instead substitute the following:

  • 3/4 cup oat flour (in addition to the 3/4 cup oat flour in the original recipe)
  • 2 tbsp coconut flour
  • 2 tbsp arrow root flour

Allow batter to sit for approximately 10 minutes before scooping into muffin liners, so the coconut flour has a chance to absorb the additional liquid.


Key Lime Pie

Spring and summer are great months to make desserts like these. Refreshing, light, and almost guiltless. You’ll love this spin on traditional key lime pie.

Ingredients:

Fermented ‘Cheese’

  • 2 cups raw cashews (soaked for at least 4 hours)
  • 1/2 cup full fat coconut milk
  • pinch of salt
  • 1 probiotic capsule

Filling

  • 1 batch of fermented “cheese”
  • 1/2 cup raw honey
  • 1/3 cup melted coconut oil
  • 1/4 cup coconut milk
  • 1 tsp vanilla extract
  • 3 large limes (zest & juice)
  • 2 tsp grass fed gelatin
  • 1/3 cup hot water

Crust

  • 1 cup pecans
  • 1 cup dates
  • 3/4 cup shredded coconut
  • 3 tbsp raw honey
  • 2 tbsp melted coconut oil
  • 1/2 tsp vanilla extract

Directions:

Make the fermented cheese part of the recipe the day or night before you plan on making the rest of your dessert. Puree the cashews (drain and rinse), the coconut milk and salt in a high speed blender until light, smooth, and creamy. Open the probiotic capsule into mix. Pulse lightly until just combined. Place this mixture into a clean bowl, cover with a tea towel and set in a warm place on your counter to ferment overnight.

To make the crust, pulse all ingredients in food processor until well combined and sticking together. Press into a spring formed pan with your hands. Set aside.

To start the filling, make sure you have all ingredients ready to throw in the blender as once the gelatine starts setting, you’ll need to move fast. Place the gelatine in the hot water and whisk with fork. While it’s blooming, add remaining ingredients into the blender (reserve the zest of one lime for garnish). Once the gelatine is starting to thicken (in about 2 minutes), place in blender with rest of the ingredients. Blend on medium-high until well combined, light and fluffy. Pour mixture over crust. Top with reserved lime zest and move into the fridge to fully set (I’d give it at least 4 hours).

Remove at any time to cut and serve!

Tips & Ideas:

You don’t HAVE to make the fermented cheese. If you don’t have enough time, I would just make the cashew cheese without the probiotic pill and add it to the filling recipe.


Lemon Blueberry Coconut Muffins

Who doesn’t love having a good muffin to grab on the go? These muffins are gluten-free, nut-free, dairy-free and taste AMAZING!!

Ingredients:

  • 1 cup coconut flour
  • 1/2 tsp sea salt
  • 1 tsp baking soda
  • 2 tsp cinnamon
  • 1   1/4 cup canned coconut milk
  • 4 tbsp chia seeds
  • 6 large eggs (beaten)
  • 1/2 cup raw honey (very soft or melted)
  • 4 tbsp coconut oil (melted)
  • 1 lemon zest
  • 1/8 cup fresh lemon juice
  • 4 tsp vanilla extract
  • 1   1/2 cup frozen or fresh blueberries

Directions:

Preheat oven to 350F.

Mix coconut milk with chia seeds and set aside for at least 10 minutes to thicken (whisking every few minutes to ensure even thickening).

In a separate small bowl, sift dry ingredients and set aside.

In a large bowl mix the rest of the ingredients (except for the blueberries). Add coconut milk mixture to wet ingredients and whisk to combine. Gently add dry ingredients to wet ingredients. Mix until just combined. Add in blueberries and gently fold. Batter will quickly thicken and be on the thicker side.

Pour batter into greased or lined muffin tins, filling 3/4 full. Bake for 20-25 minutes until muffins are golden brown. Immediately remove from tins and cool on wired rack.

Store on the counter for 3-4 days. Freeze excellent!


Carrot Cake Muffins with Cashew Cream Cheese Icing

Who doesn’t love traditional carrot cake with cream cheese icing? These muffins so are so good, no one will ever know they are gluten, dairy and refined sugar-free!!

Ingredients:

Carrot Cake Muffins

  • 1 1/4 cup arrow root starch
  • 1 3/4 almond flour
  • 4 tbsp coconut flour
  • 1 tsp baking powder
  • 1 tsp baking soda
  • 1/2 sea salt
  • 3 tsp cinnamon
  • 1 1/2 tsp all spice
  • 1/2 tsp nutmeg
  • 6 large eggs (whisked)
  • 2/3 cup full fat coconut milk
  • 1/2 cup melted coconut oil
  • 2/3 cup raw honey (melted)
  • 1 cup raisins
  • 3/4 cup shredded coconut
  • 3 cups grated carrot

Cashew Cream Cheese Icing

  • 1 cup raw cashews (soaked for 4 hours)
  • 3 tbsp melted coconut oil
  • 3 tbsp raw honey (melted)
  • 1 1/2 tsp freshly squeezed lemon juice
  • 1 tsp vanilla
  • 1/2 sea salt
  • 1-3 tbsp water (as needed for blending)

Directions:

Preheat oven to 350 degrees. Mix all dry ingredients (except raisins, coconut, and grated carrots) in large bowl and mix until combined. Set aside.

In medium bowl, whisk 6 eggs and then add in the remainder of the wet ingredients. Add wet ingredients to dry ingredients in the large bowl. Let sit for 5 minutes to allow the coconut flour to absorb the excess liquid.

Fold in the remainder of the ingredients – raisins, coconut and carrots – until just combined. Fill greased muffin cups 2/3 full. Bake for 20-30 minutes (until slightly browned toothpick comes out clean).

Cool completely on wire rack before icing.

Cashew Cream Cheese Icing:

Drain cashews. Place all ingredients (except water) in high speed blender. Blend until smooth and creamy adding water only as needed to give the mixture just enough moisture to whip up.

Ice cooled muffins and top with chopped nuts of choice (I prefer Pecans). Store on the counter for 3-4 days or in the fridge if your icing is on the runny side. These freeze excellent!


Gluten-Free Ginger Cookie

Everyone loves a good soft, chewy ginger cookie. The challenge is making them taste good when you don’t eat gluten. This recipe has become a family favorite as even friends who eat “normal” would choose these over any gluten, re-fined sugar filled cookies.

Ingredients

  • 1 cup gluten-free oat flour
  • 3/4 cup brown rice flour
  • 1/4 cup tapioca flour
  • 1/4 tsp xanthan gum
  • 1 tsp baking soda
  • 2 tsp ground ginger
  • 1 1/2 tsp ground cinnamon
  • 1/2 tsp ground allspice
  • 1/4 tsp sea salt
  • 1/2 cup unsalted organic butter, melted
  • 1/3 cup molasses
  • 2/3 cup + 1/3 cup coconut sugar
  • 1 large egg
  • 1 tsp vanilla extract

Directions

In the medium mixing bowl, combine all the flours, spices, salt and making soda a set aside.

In the large mixing bowl, mix the melted butter, molasses, and 2/3 cup of the coconut sugar. Whisk in the egg and vanilla. Slowly add in the flour mixture (from the medium mixing bowl) and mix vigorously until very well combined.

Cover the dough and put in the refrigerator for at least 2 hours (preferably overnight).

When you want to bake the cookies, preheat the over to 350ºF. Line your cookie sheets with parchment paper. Place 1/3 cup of the coconut sugar in a small bowl. Roll the cookies into 1″ balls and roll in the sugar. Place the sugar coated balls on cookie sheet (about 2″ apart). Press each cookie down slightly with fork or spoon.

Bake the cookies until they are puffed and cracked (about 7-10 minutes). Let cool slightly on cookie sheets before moving to a wire rack to completely cool

Makes about 2 dozen cookies. Freezing the cookie dough is a great idea to ensure you don’t eat the entire batch at once. Freeze individual cookies once they have been pressed down on a cookie sheet. Once they have froze solid, they can be transferred to a freezer safe container for later baking.


Sourdough Cinnamon Buns

Cinnamon buns are one of those treats that takes me right back to my childhood. The ever so amazing combination of sugar, butter, cinnamon and light fluffy dough – what could be better?!

ALOT!

I set out to create a recipe that was dare I say “almost” healthy so that my kids could also enjoy this treat and I didn’t have to spend the next 24 hours peeling them off the ceiling from the sugar high.

Now – before we go any further I have a confession…I am NOT a baker and this is the very first time I have made cinnamon buns. They turned out AMAZING! Even with me completely butchering and combining about 5 recipes I found online. So if you are a newbie – feel confident that you also can create this masterpiece!

Ingredients:

Dough

  • 1 cup sourdough starter
  • 1/4 warm water
  • 1 tsp salt
  • 1/3 cup butter or coconut oil
  • 2 eggs
  • 1 cup sprouted whole wheat flour
  • 1-2 cups red fife flour (low in gluten)

Filling

  • 1/2 cup butter (softened)
  • 1 tbsp cinnamon
  • 1/3 cup palm sugar
  • 1 tbsp brown sugar
  • 1 tbsp cane sugar (optional)

Directions:

Measure the sourdough starter into a large mixing bowl.  Add the warm water, salt, melted butter or coconut oil, and eggs. Mix well.

Gradually add the flour until the dough forms a ball and is soft, not sticky.

Turn out onto lightly floured surface and need until smooth and elastic, place the dough into a lightly oiled (coconut oil)  bowl, turning to coat. Allow to rise until double. The length of rise will depend upon how active your starter is. I let mine raise about 7 hours.

Punch dough down and roll out on a lightly floured surface into approx 18 x 20 inch rectangle.

Prepare the filing. Mix all the ingredients in a small bowl. Spread the dough with the filling.

Starting on the long side, gently roll the dough into a log. Using a piece of string, slide it under the roll, wrap around and cross the strings cutting off approx 1 inch pieces.

Place in oiled 9×13″ baking dish and let sit covered with towel for approx 1 hour.

Preheat the oven to 350 degrees and bake for 30 minutes.

Remove from oven and ENJOY!